Pro:n lämpötila-anturi on supertarkka ja mikäli se näyttäisi väärin se olisi silloin rikki. Sen mukaan kannattaa kalibroida muut anturit, kunhan laittaa ne tarpeeksi pitkäksi ajaksi tasoittumaan.
Niin kuin noista mittauksistani käy ilmi, uusi Ruuvi ja RuuviPro antoivat aika samansuuntaiset lukemat, mutta lähes jokainen vanhempi Ruuvi heittää asteella. Jotkut toisetkin olivat kirjoitelleet samasta asiasta: vanhat ja uudet Ruuvit näyttävät eri lämpötilaa. Siihen en nähnyt vastausta.
Anturit laitteissa ovat erilaisia ja myös kaikissa antureissa kalibraatio liukuu ajan myötä johonkin suuntaan. Vanhoissa laitteissa on Bosch BME280 (tyypillinen tarkkuus ±0,5C huoneenlämmössä) ja uudemmissa valkoisissa RuuviTageissa Sensirion SHTC3 (tyypillinen tarkkuus ±0,2C huoneenlämmössä). RuuviTag Prossa Texas Instruments TMP117 (absoluuttitarkkuus ±0,1C huoneenlämmössä).
Henri replied: The Pro’s temperature sensor is super accurate and if it looks wrong it would be broken. According to that, it is worth calibrating the other sensors, as long as you leave them for a long enough time to equalize.
Mikko replied: As can be seen from my measurements, the new Ruuvi and RuuviPro gave fairly similar readings, but almost every older Ruuvi throws by a degree. Some others had also written about the same thing: old and new Screws show different temperature. I didn’t see an answer to that.
Henri responded: The sensors in the devices are different and also in all sensors the calibration slides in one direction over time. The old devices have Bosch BME280 (typical accuracy ±0.5C at room temperature) and the newer white RuuviTags Sensirion SHTC3 (typical accuracy ±0.2C at room temperature). Texas Instruments TMP117 in RuuviTag Pro (absolute accuracy ±0.1C at room temperature).
Hei,
Ostin juuri tuon perusmallin Ruuvin ja huomasin, että se näyttää 2-3c enemmän kuin muut mittarit. Tein tässä vertailua niin sisätila-, kuin myös ulkolämpötiloja mitatessa. Kalibroinnilla sain tuon korjattua, mutta hieman hämmästyin tuosta lämpötilaheitosta kuitenkin.
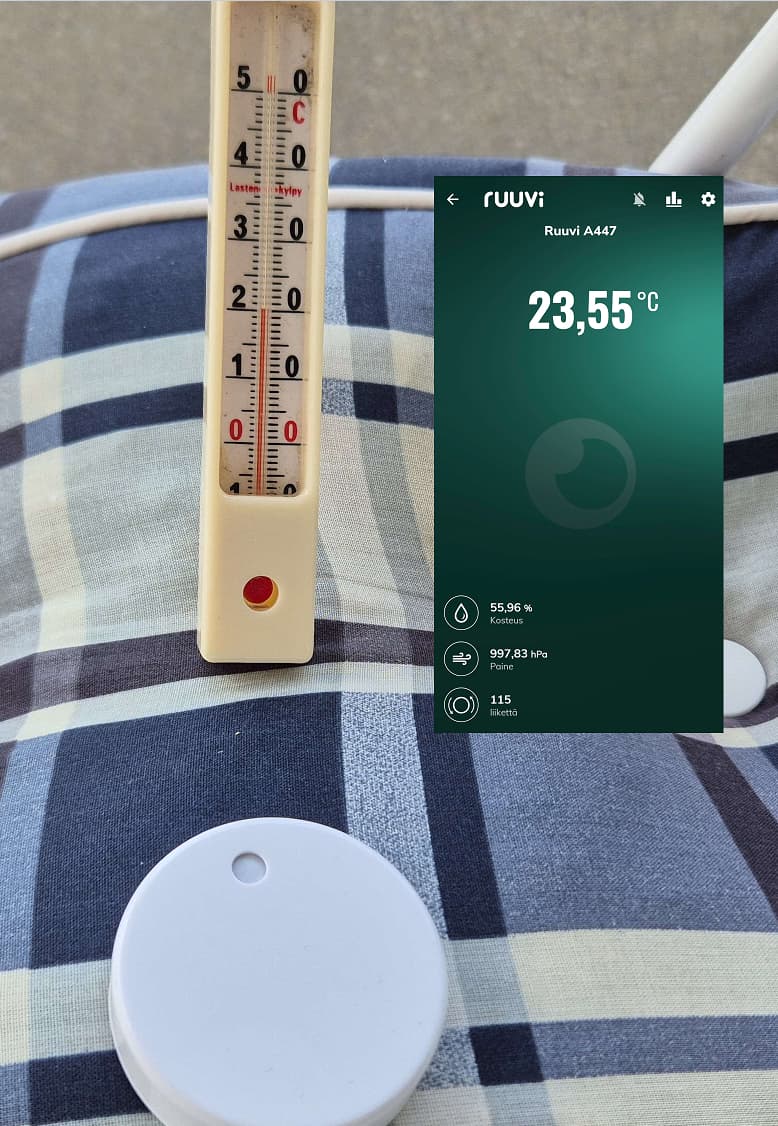
Huomasin tässä joku aika sitten, että virhe korjaantui (tai ainakin pieneni) sen jälkeen, kun olin vaihtanut patterin. Luulisi uudessa tagissa olevan patterin varaukset kohdillaan, mutta ehkä silti kokeilemisen arvoinen temppu, jos vaikka patteri onkin päässyt tyhjentymään tai muuten viallinen.
Hei @TMH_9316 ,
Kiitos viestistäsi!
Eri tyyppisiä mittareita ei kannata verrata toisiinsa oikeastaan lainkaan ei-kontrolloiduissa olosuhteissa. Jopa aivan vierekkäin olevilla mittalaitteilla voi saada hyvinkin erilaisia tuloksia useista eri syistä. Lisäksi on muistettava, että jokaisella mittarilla kestää aikansa asettua ympäröiviin olosuhteisiin. Tästä tietoa RuuviTagin kohdalla täältä.
RuuviTagia ei tarvitse normaalitilanteessa kalibroida, mutta lämpömittarin ja RuuviTagin ns. nollan varmistamiseksi voi tehdä seuraavanlaisen kontrollitestin:
Huom! Tarvitset tämän testin suorittamiseksi ilmatiiviin astian, jäämurskaa ja vettä.
Tässä testissä pyrimme 0°C tavoitelämpötilaan asettamalla jäämurskaa ja vettä tiiviiseen astiaan, joka on asetettu kontrolloituun tilaan (suojattu auringonvalolta, vedolta tai lämpötilavaihteluilta). Varmista, että jää on astian pohjalla vedessä olevien mahdollisten lämpötilaerojen tasaamiseksi.
- Varmista, että Ruuvi anturi on tiiviisti suojakotelossaan ennen sen asettamista astian sisään. 2 .Varmista, että anturi ei pääse kosketuksiin veden kanssa ja sulje astian kansi tiiviisti.
- Odota, kunnes anturista Ruuvi Stationiin saatava mittaustulos saavuttaa 0°C tavoitelämpötilan.
- Seuraavaksi, siirry Ruuvi Station sovelluksessa anturin asetukset -sivulle, avaa kalibrointi-kohdasta vaihtoehto lämpötila ja valitse Kalibroi. Anna nykyinen tunnettu arvo 0°C ja vahvista kalibrointi.
Hei @matso ,
Erikoista, viallisia paristoja tulee harvoin vastaan, jos lainkaan. Tämä on tietysti mahdollista, mutta se ei ole aivan todennäköisin syy tuolle ongelmalle. Otathan yhteyttä tukeen, jos tuon anturin kanssa on vielä ongelmaa.
TMH_9316, on Jul22 added:
Hi,
I just bought the basic model Ruuvi and noticed that it shows 2-3c more than other meters. I made a comparison here when measuring both indoor and outdoor temperatures. I was able to fix that with calibration, but I was a little surprised by the temperature difference anyway.
I noticed here a while ago that the error was fixed (or at least reduced) after I had replaced the battery. You would think that the battery in the new tag has the right charges, but maybe it’s still a trick worth trying, even if the battery has run out or is otherwise defective.
Matso added: I noticed here a while ago that the error was fixed (or at least reduced) after I replaced the battery. You would think the battery in the new tag would have the right charge, but it might still be a trick worth trying if the battery has run down or is otherwise faulty.
Marko responded: Thank you for your message!
It is not advisable to compare different types of meters in uncontrolled conditions. Even measuring devices placed right next to each other can give very different results for various reasons. It is also important to remember that each meter takes time to adjust to the surrounding conditions. Information about this for RuuviTag can be found here
Anturin aikavakio tai mittauksen viive - Ruuvi.
RuuviTag does not need to be calibrated in normal situations, but to ensure that the thermometer and RuuviTag are zero, you can perform the following control test:
Note! To perform this test, you will need an airtight container, crushed ice and water.
In this test, we aim for a target temperature of 0°C by placing crushed ice and water in a sealed container that is placed in a controlled space (protected from sunlight, drafts or temperature fluctuations). Make sure that there is ice at the bottom of the container to equalize any temperature differences in the water.
Make sure the Ruuvi sensor is tightly sealed in its protective case before placing it inside the container. 2. Make sure the sensor does not come into contact with water and close the container lid tightly.
Wait until the measurement result from the sensor to the Ruuvi Station reaches the target temperature of 0°C.
Next, go to the sensor settings page in the Ruuvi Station app, open the calibration option temperature and select Calibrate. Enter the current known value of 0°C and confirm the calibration.
Marko
Staff
It is rare, if ever, to encounter a faulty battery. This is of course possible, but it is not the most likely cause of the problem. Please contact support if you are still having problems with that sensor.