We had in Centria University of Applied Sciences a use case where we needed to detect if object is in its place or not. We decided to tackle this with Ruuvitag and OneWire RFID reader.
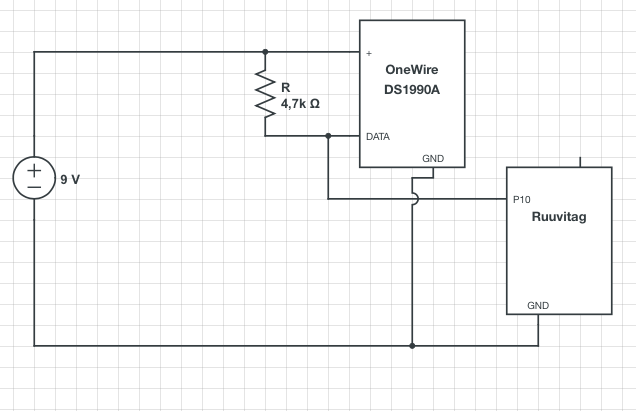
Our talented interns connected OneWire device to Ruuvitag P10 input port and powered it with same battery where Ruuvitag gets its power. But as OneWire RFID scanner requires more power we needed to come up with external power (9V). As this would break Ruuvitag we powered OneWire from 9V and Ruuvitag from its own battery. This required us to share the same ground in order to get OneWire signal correctly to Ruuvitag.
Programming was done in Espruino, which seems to be our favorite prototyping tools (with Ruuvitag ofcourse). If RFID tag is connected to reader is scanned in very short periods. If tag is not connected OneWire returns “not found” and once tag is connected OneWire returns tag id.
From every scan we update Eddystone URL, this URL tells if tag and which one is connected (if any). Change of this URL is detected by our WIFI connected Intel Edison. Edison then forwards information to MS Azure where information is stored for later use.
Using Ruuvitag with Espruino works very well in fast prototyping, and in this case we were able test our idea and now we enough information to start planning of final product.
I too wanted to use 1-wire with RuuviTag, but 1-wire wasn’t supported by the RuuviTag firmware. I was so lucky to see your post, thank you. Now I have to try Espruino on RuuviTag. Do you think that I can read a 1-wire network with several sensors, or can I only connect one 1-wire sensor?
It should be possible to use multiple 1-Wire sensors, at least thats whats 1-Wire is for. On Espruino side you can query devices that are attached to same physical port but still are individual 1-Wire devices. I’ll post our code and schematics later once I get my hands on them
I think it’d be better to use pull-up on RuuviTag side only. That way the data line would be at maximum of 3,3 V and there is no risk of destroying the MCU. I think it should work fine. Anyway 1-Wire works so that the communicating device pulls the line down to send bits and the resistor brings it back up.
We have not, we are using separate battery for one wire (9V) and coin cell battery for Ruuvitag (also we have option to use AA’s for Ruuvitag). If we encounter high drainage we are able to change batteries very quickly. In our case batteries have to last only Finnish summer so I think we are ok with our setup =)