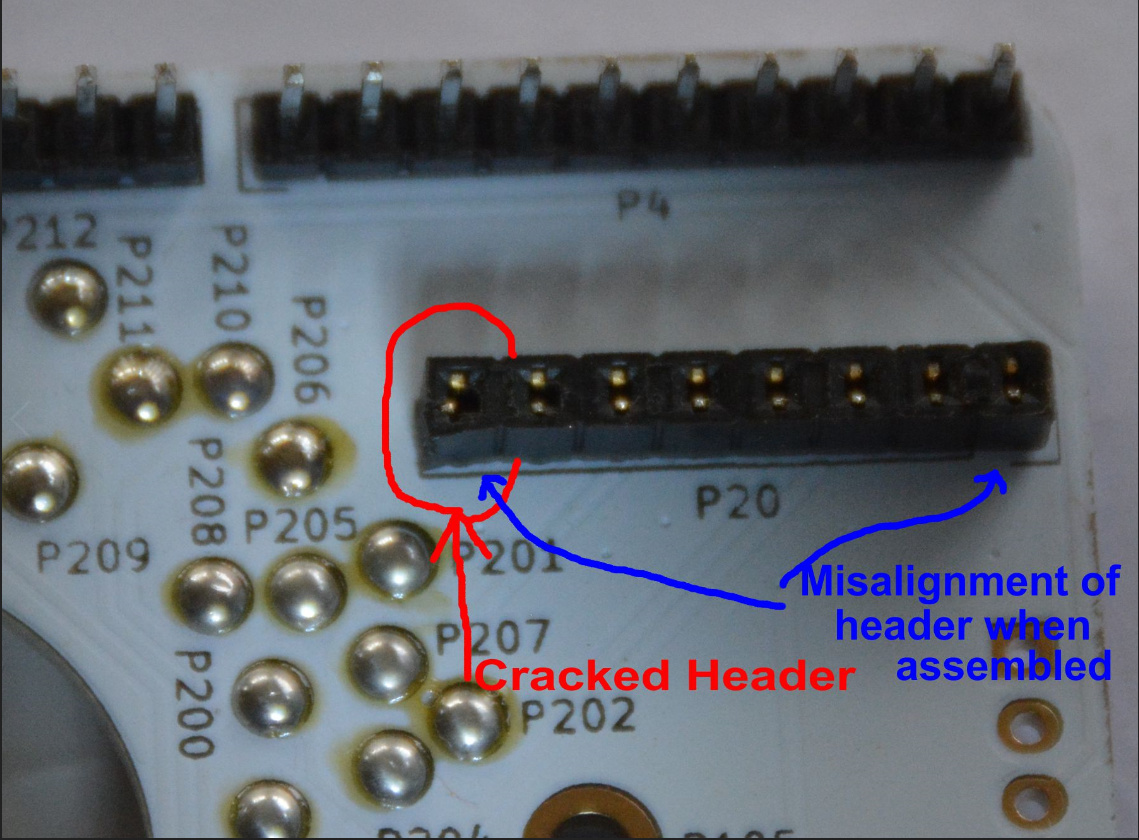
Purchased a trio of tags and the devkit. When the package arrived, the Development Shield bag was previously opened (seal was broken) but all looked AOK. Tried to follow Otso’s blog this weekend and when I tried to mount the shield onto the Nordic eval board, I noticed that the debug connector was soldered onto the shield at an angle and the 1x8 connector was cracked. Appeared that the contacts were still making contact with the pins on the Nordic board so decided to give it a whirl.
Followed the RuuviLab | Segger Embedded Studio to get Seeger loaded and working but could not debug. Then tried Otso’s 1st blog (https://blog.ruuvi.com/ruuvi-firmware-part-1-sleep-57d10787f0aa) with the same condition … red LED blinks approx 2HZ and the code likes to hang out about address BAA4. Assuming this may be an issue with the bootloader but not sure. Programs compiles, downloads and verifies with no issues.
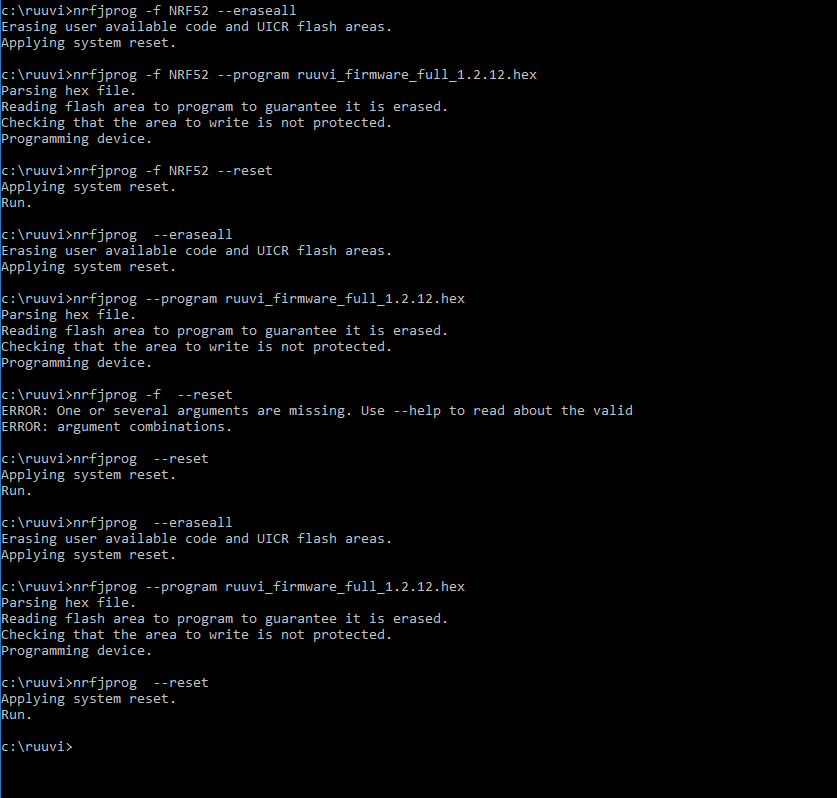
I ran the following via CLI: “nrfjprog -f NRF52 --eraseall” and was able to properly execute your blog example. Thanx for the input
When following “https://lab.ruuvi.com/ses/” tutorial … “Select “Target” from the top bar and “Connect to JLINK”. To flash the project, select “Target”->“Download ruuvi.firmware.c”. This will erase the tag and flash the softdevice + application to the RuuviTag.”
==> the same issue arose with the bootloader issue and the 2Hz blinking LED.
==> If I go to CLI, issue the “nrfjprog -f NRF52 --eraseall”, and then download ruuvi.firmware.c, all is happy feet.
==> The tutorial needs to expand “It’s important to note that the download will not include the bootloader” in more detail
For “Debugging the project … Select “Target” and “Connect JLINK”. Then Select “Target” and “Attach debugger”. Now you should see the program running and printing log texts from PLATFORM_LOG_INFO to the debug terminal.”
==> The firmware starts execution and if any breakpoints were enabled in the Debug window, they are ignored. Need to restart the debugger to get the breakpoints functional
==> My typical process:
1) Load solution
2) Set breakpoints
3) Under Target, select “Connect J-Link”
4) Under Target, select “Download ruuvi.firmare.c”
5) Under Debug, select “Go”
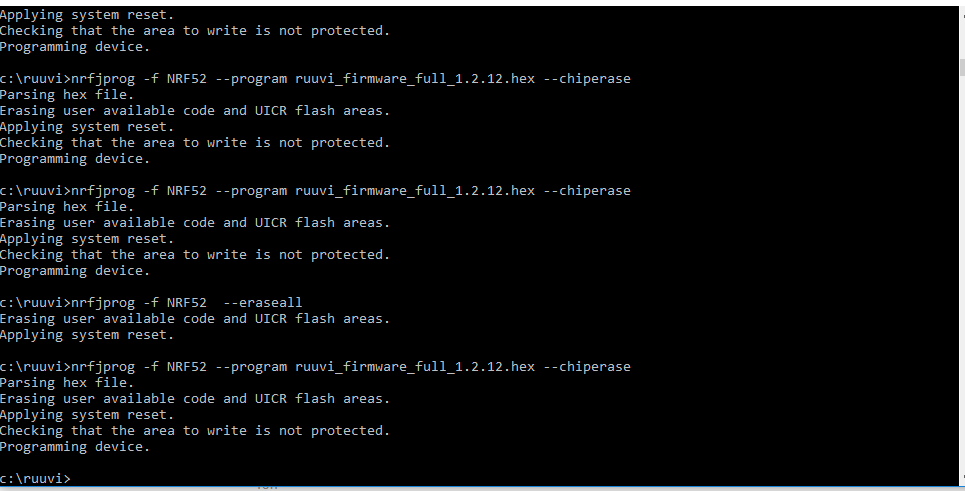
To restore the Ruuvi Tag, from CLI: “nrfjprog -f NRF52 --program ruuvi_firmware_full_1.2.12.hex --chiperase”
==> If Ruuvi Tag connected to Dev Shield" it needs to be power cycled after updating F/W
==> With this level of F/W, the red LED flashes but the Green LED no longer illuminates for a second or two during the power-on sequence. Is this normal? The other ruuvi tags that I have flash the green LED during the power-on sequence
==> With this level of F/W, the red LED flashes but the Green LED no longer illuminates for a second or two during the power-on sequence. Is this normal? The other ruuvi tags that I have flash the green LED during the power-on sequence
The green led does not flash on boot if one of the sensors did not reply on boot. Can you check if you’re still receiving full sensor information on your development tag, i.e. not only temperature from nRF52?
All sensors were reporting and working via Ruuvi Station. Removed the Tag from the dev shield and re-installed the battery. Now Ruuvi Station cannot see the Tag but it (the Tag) still blinks the red LED. Put the Tag back on the dev shield and tried reprogramming a couple of times but no luck
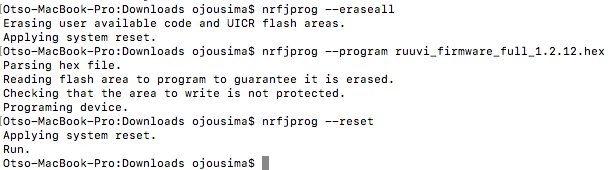
One more thing that comes to my mind is power cycling the tag, just in case one of the sensors would be in some weird state. For reference, here’s my reprogram cycle, at least I can’t see any difference between yours and mine.
When parcel arrived, Dev Shield bag had been opened but nRF52-DK bag was sealed
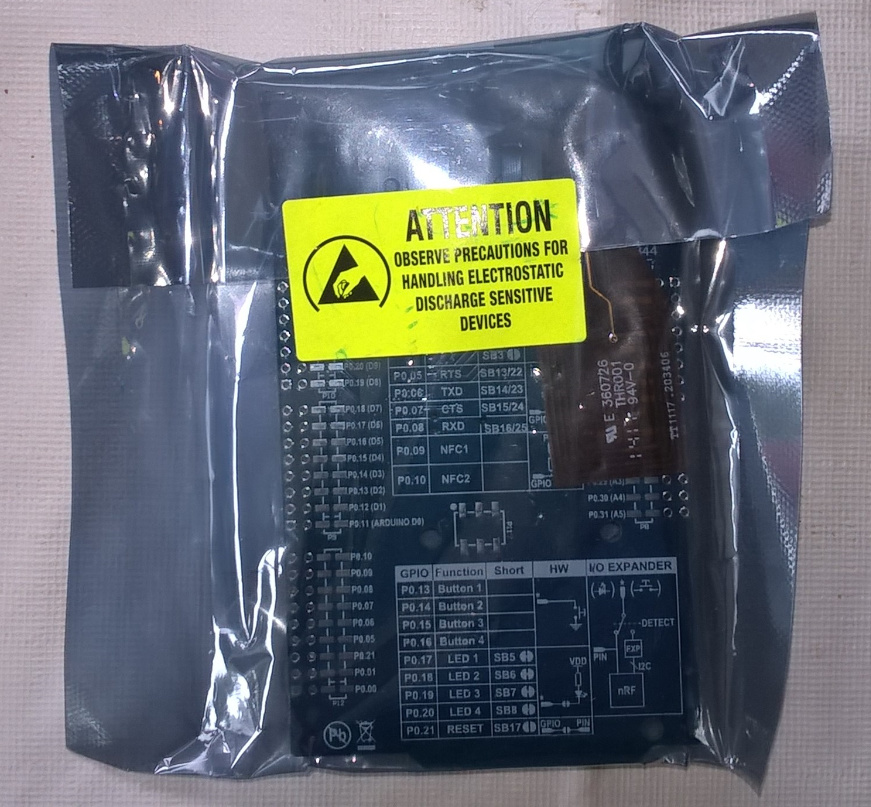
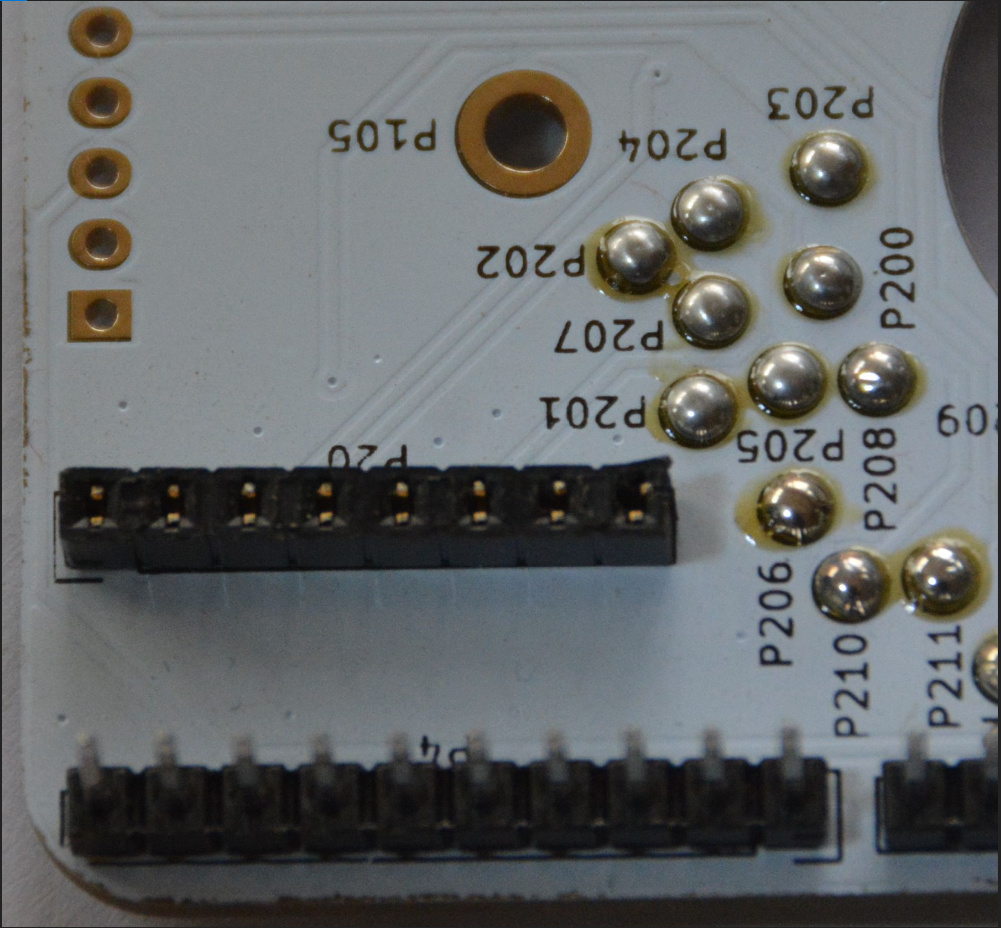
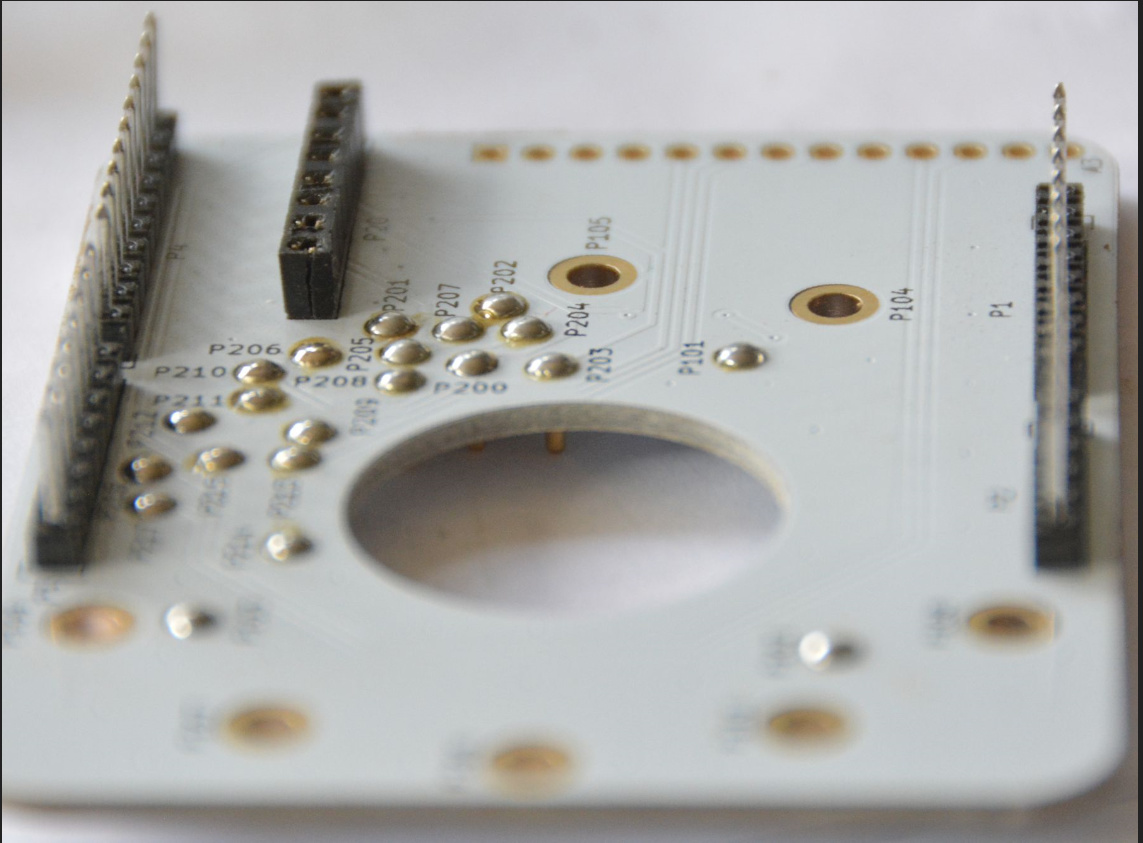
During Dev Shield assembly, the JTAG header was not aligned when soldered
The header misalignment and cracked header was observed when Dev Shield initially placed on top of the nRF52-DK.
==> Dev Shield connectors were not aligning with nRF52-DK connectors
==> Observed cracked header and misaligned JTAG header
==> Did not want to wait 2 to 3 weeks for a new Dev Shield so I gently inserted Dev Shield onto nRF52-DK.
==> Even though header cracked, visually, the pins looked like they were still making contact so decided to go ahead and mount a Ruuvi Tag onto the Dev Shield and start learning the Ruuvi environment (want to understand code with long-term objective of adding sensors to the Tag).
==> Do not want to mount another Ruuvi Tag onto the Dev Shield until we F/A why the Tag that was mounted onto the Dev Shield is not properly functioning
Couple of comments:
Ruuvi should not ship returned/used parts as “new” parts … especially parts used for development purposes
Dev Shield PCBAs should be cleaned after hand soldering. A lot of flux about soldering joints … some fluxes can cause long-term reliability issues … do not know what flux was used during hand soldering
Don’t know if this is associated with some of the issues that I have been experiencing but it would be nice if you send a new Dev Shield to replace the defective shield that was originally shipped
@WizardAtLarge if the contact between the tag and the development kit has been poor, it could be that the nrfjprog programmed the DK instead of the tag. I usually cut SB9 next to nRF current measurement header to be 100% certain that the correct target gets cut, and connect the current measurement header with a jumper if I want to use the DK itself. Otherwise I’d guess there is some damage to components of the RuuviTag which prevents proper boot up, as I have exactly same setup with hardware and firmware here and it works fine.
Sorry that you have received a broken devshield. We don’t ship any returned or used items. We have used recycled bubble packing material for devshield and there has not bee used any seal. We are also looking a new supply for the devshields.
Henri,
Thank you for your quick response. A couple of comments that may help going forward:
Products should be sealed in bags (taped or thermally) after QA to help insure that other products do not get mixed into that product stream. If not, there is no traceability and poop happens.
I prefer sealed bags: I’ve seen millions of dollars of inventory lost because products were tape sealed (unsealed bags with no desiccant) and shipped from China to the US via sea. For the three weeks that the products were at sea, the salty, moist air got into the bags and corroded the aluminum castings. Was an ugly experience. Thermal sealers are not that expensive these days and worth every bit of their cost.
Unsealed parts pulled from bins need to be re-qualified prior to shipping (or use) and binned accordingly. For example: while assembling PCBAs, is that 0402 10K resistor that you pulled from the open bag really a 10K resistor? What checks and balances do you have in place to confirm that it is a 10K resistor? Traceability through the supply chain is a necessity for all products
All PCBs should have time stamps and part numbers silkscreened onto the PCB. PCBAs should have part and revision codes labeled (via labels or permanent marker). This applies to all products - shipping or in-house. This may seem like extra work but if it becomes habit now, life is easier when volumes ramp. On the Dev Shield, there is an “A3” silkscreen but hard to tell if this is a model number or a header label. The Ruuvi Tag does have the “B6” mask
For all PCBA related products, production or development, prior to QA, they should be cleaned. For small production volumes that are not rinsed during the manufacturing process, it does not take a lot of effort to grab a brush (we’ve used toothbrushes in the past) with some alcohol and scrub off the post-soldering flux followed by a quick water rinse. Yes, the flux used may be stable over time but that is only part of the equation. When I see flux remnants on a board, it reminds me of boards you buy on Banggood that failed QA, reworked, and sold on the secondary market at dirt cheap prices. Visual impressions do matter … even to engineering nerds in the lab … who are also stakeholders in what components and tools will be used in the products that they are developing. Thumbs-up for Ruuvi’s Dev Shield: quality pogo pins and a PCB able to take the forces applied when a Tag is secured onto the shield … but the flux … hmmmmmmmmmm
Even for low-volume products like the Dev Shield, a QA process needs to be in place. I do not know what Ruuvi has implemented, but the shield that I have got through it and who knows where it has lived. The Nordic nRF52-DK requires accurate positioning of the headers of a Dev shield if the P20 (JTAG header) is used. This requires a jig to locate the headers precisely during soldering. The Dev shield that I have has the P20 header skewed and is not perpendicular to the PCB. With P4 and P20 so close to each other, tolerances do matter. My suggestion: use a jig during soldering of P1, P2, P3, P4 and P20 to properly position the headers. After soldering, verify the header placements by manually installing the Dev shield onto a reference - may it be a gold-standard or a dead nRF52-DK with unbent pins and headers. In the past, for small volume runs, we’ve used the later - dead boards (i.e. most likely there are some dead nRF52-DKs hanging out in your lab)
Kudos for reusing packing material! I encourage re-use but many in shipping will pitch incoming packing material unless they are pressured to re-use it (the generic comment: “using ‘that stuff’ takes extra time for packing outgoing so I just pitch it”
Finally: when shipping internationally, beware of using DHL envelopes. Envelopes get tossed about, bent folded and who knows what else … and internals get crushed. I like the Ruuvi Tag 3-pack packaging - we call it the “McDonald’s Apple Pie box” or the “Burrito box” here in the USA. Fun presentation but when I opened the DHL envelope, the box was flattened and bent. Dev shield box was flattened as well. Nice packaging for store shelves but not for DHL envelopes
I hope my comments help. Many growing pains exist when transitioning from “start-up teams” to medium sized companies. The more input that you have to reflect upon during that transition, (the) less pain will be felt.
@WizardAtLarge Thanks again for taking the time to type this down! This is how feedback should be like and we always welcome constructive and informative feedback
We’re about to redesign the DevShield and aiming to use only SMD components on it. This will have many advantages and the most important one will be more constant quality.